Joshua Tree National Park
There is little to no cell service in Joshua Tree National Park.
If you download the guide and save it, you’ll be able to use it offline in the park.
West Entrance
For most visitors, the quickest way into the park is through the West Entrance. Because of this, the line to get in can become long and extremely time-consuming, especially mid-morning and on weekends. If you can, arrive early.
Facilities
Small paved parking area with a restroom and water. You won’t find water or a restroom with water until you reach one of the visitor centers.
Expect little to no cell service beyond this point.
Quail Springs
This is the first large parking area after the West Entrance, so it can get a little crowded here. If it’s too crowded or you don’t feel like stopping so soon after entering the park, there are other areas with restrooms, picnic tables, and better trails ahead.
Facilities
Large paved parking area with a restroom and picnic tables.
Area Description
As you turn off Park Blvd, you’ll see a small parking area in front of a large rock formation. If you follow the road around, it leads to a larger parking area with a restroom and several picnic tables. If you want to stretch your legs, there’s an easy path around the formation. If you go counterclockwise, you’ll have a slight downhill walk with better views.
Boy Scout Trail
This is one of my favorite trails in the park. When most of the other trails are in the shade, this one catches the last bit of sun, making it an excellent choice about an hour or two before sunset.

Facilities
Large unpaved parking area with a restroom.
Trail Description
The first mile of this trail makes for a pleasant out-and-back stroll through a beautiful area of the park. At the start, the trail crosses a sandy wash, then becomes wide and hard-packed with a gentle rise for the first mile. At half a mile, you’ll come to a boulder pile with a few rocks to rest on. At 1 mile, you’ll reach the huge mountain of granite you can see from the parking area—a good place to turn around if you’re looking for a shorter hike.
At this point, the trail turns left and climbs gently along the base of the mountain. In three-tenths of a mile, you’ll reach a fork marked by a park sign for the Willow Hole Trail. If you take this trail to the right and follow it for a tenth of a mile, you’ll come to a high point where the trail dips a little and you get this amazing view over a big, beautiful valley.
From here, the trail continues into the heart of the valley, then veers to the right and heads up it. Near the top of the valley, roughly 2.3 miles from the trailhead, you’ll see a towering rock formation on the right with a spine of granite running right to the edge of the trail. If you climb up on this spine, you’ll have a 360-degree view over a cool area of the park. Watching the sunset from up here can be pretty epic.
This is also a good place to turn around. Beyond this point, the character of the trail changes dramatically. The final mile follows a sandy wash through a canyon of large rock formations to a park sign marking the trail’s end. From there, you’re about 3.5 miles from the trailhead.
Hemingway
I love Hemingway. The rock formations surrounding the parking area are amazing, the short, easy walk to the first little rock formation is well worth effort, and it’s usually not as crowded as some of the other nearby areas. If I had my mom or young kids with me, I’d definitely bring them here.
Facilities
Medium-sized paved parking area with a restroom.
Trail Description
From the far right side of the parking area, a flat, hard-packed trail leads a short distance to a healthy pinyon pine standing guard over an impressive little rock formation. From there, the trail crosses a small valley to the Hemingway Buttress—a large wall of granite with several classic rock climbs. On the way to the buttress, keep an eye out for an incredible view looking north over the desert with the mountains way off in the distance.
Hidden Valley
This is one of the busiest areas in the park. The big draw here is the extremely popular Hidden Valley Nature Trail—a 1.1-mile loop through a beautiful valley surrounded by large rock formations. This trail can get very hot. To avoid the heat, and the crowds, it’s best to walk this trail in the early morning.
Facilities
Paved parking area with restrooms, picnic tables, and a paved walkway on both sides of the road.
Area Description
As you enter the one-way loop road, you’ll see the trailhead for the Hidden Valley Nature Trail on the right. Just beyond it, you’ll come to a short loop road off the main road with limited parking and a few picnic tables tucked against a wall of boulders.
Beyond that is the least crowded and most accessible area in Hidden Valley, with a couple restrooms and several picnic tables close to the parking area. You’ll find more picnic tables tucked up near the base of Turtle Rock—a huge rock formation that, from a distance, looks like a giant turtle. If you’re up for a little exploring after lunch, a walk around Turtle Rock can be fun.
Trail Description
The 1.1-mile nature trail has quite a few rock steps, uneven natural surfaces, patches of soft sand, a slight downhill grade for the first half mile, and a slight uphill grade for the second half mile. Along the trail, you’ll see interpretive signs with information about some of the planets and animals you might see in the park, along with a little history of Hidden Valley.
If the parking area is too crowded, consider heading across the street to Intersection Rock or driving a little farther up the road to the Cap Rock Accessible Nature Trail and Picnic Area. Both are great options and attract far fewer people. They also offer a quieter, more relaxed way to experience this area of the park.
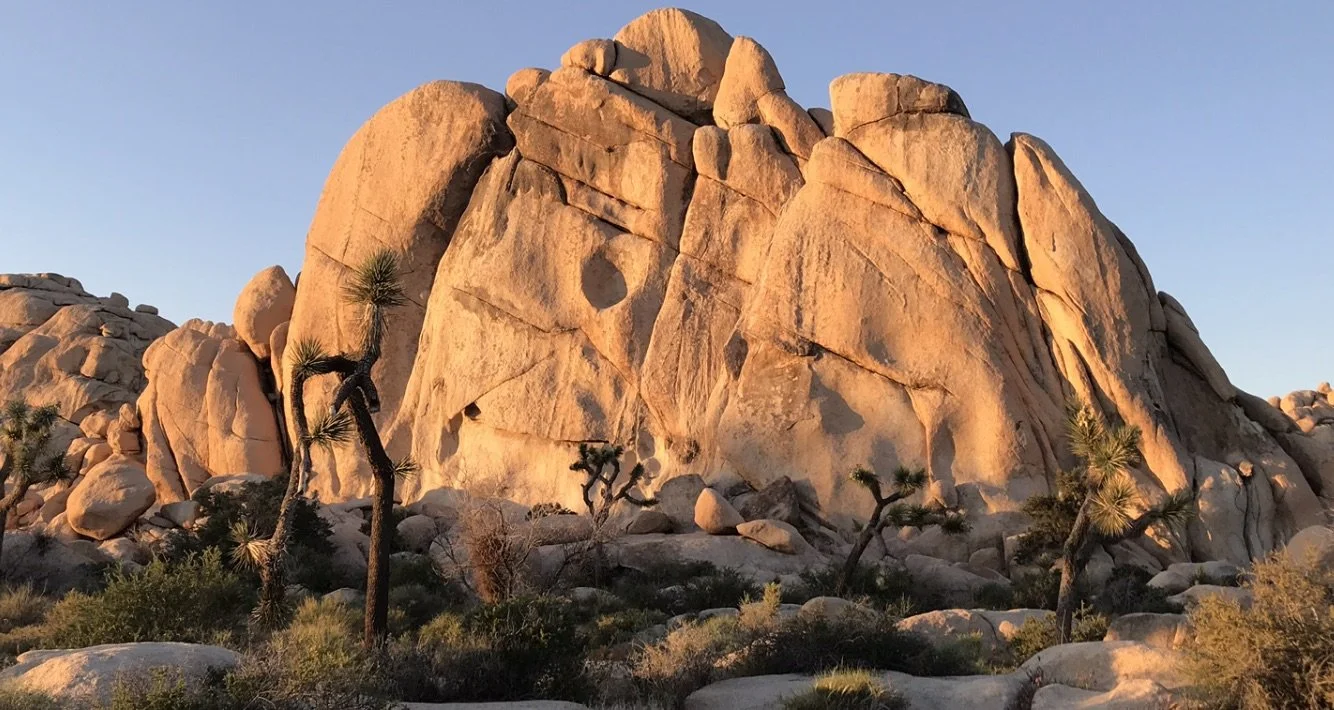
Intersection Rock
This is a great place to hop out of the car, stretch the legs, and take in the amazing scenery. From the parking area, you’ll get a sense of what makes Joshua Tree so special to so many people, especially rock climbers. For me, this is the heart and soul of the park.
Facilities
Large paved parking area with a restroom and an emergency phone next to the restroom.
Area Description
As you turn into the parking area from Park Blvd, the large dome of granite on the right is Intersection Rock, and the one on the left is The Old Woman (see photo below). Across from the parking area is the Hidden Valley Campground, a home away from home for rock climbers from all ends of the earth. Don’t be surprised to see people climbing the granite formations all around this area—it’s home to some of the park’s most popular routes.
Between the parking area and the campground, you’ll find a huge slab of granite, almost like a natural amphitheater. If you walk up on it, you’ll get a bird’s-eye view of the area. If you look to the south from here, that huge dome of granite across the street is called Cyclops, and the area behind it is definitely worth a look.
Over the years, I’ve spent a lot of time exploring the backcountry around here—wandering through the beautiful valleys, scrambling up the massive rock formations, immersing myself in the landscape. I came to Joshua Tree for the climbing, but it was the wandering that made me fall in love with this place.
Barker Dam
Love this place. The 1.1-mile Barker Dam Trail that loops out to an old dam built by cowboys in the late 1800s, then passes through a beautiful valley filled with Joshua trees and surrounded by massive rock formations, with endless opportunities for walking, exploring, and scrambling. If you’re a climber, this area is home to some of the park’s most iconic bouldering problems, including a world-class traverse called Gunsmoke.
Facilities
Large paved parking area with a restroom.
Trail Description
The trail starts out a little sandy as it heads a few hundred yards into a canyon, then turns hard-packed as it continues through the canyon for about a third of a mile to the area above the old dam. For much of the year, the basin above the dam is dry, but after a heavy rainfall or during the winter and spring months, it can transform into a beautiful little lake.
If the basin is holding water, watching the sunrise from here can be magical. Early mornings can feel especially peaceful, and the lake often attracts a variety of birds and other wildlife.
At this point, the trail skirts the edge of the lake to the top of the old dam, then descends a series of rock steps to the valley floor. From there, the trail climbs gently to the head of the valley, where interpretive signs point the way and petroglyphs can be found on some of the rock surfaces.
From the top of the valley, the trail winds through a gentle canyon before returning to the trailhead, but don’t be in a rush to leave. The valley is a wonderful place to spend a little time. I’ve killed entire days wandering around back here, exploring the valley and all the incredible rock formations. The place never ceases to amaze.
Keys View Road
This scenic paved road climbs 5.5 miles through a dense forest of Joshua trees up to Keys View - an amazing overlook with a spectacular view over Palm Springs and the Coachella Valley. Truth is, you actually get two ridiculous views from this road. On the return trip from the overlook, you’ll be treated to another ridiculous view over the Mojave. Keys View Road will also bring you to one of my favorite areas in the park - Cap Rock Accessible Nature Trail and Picnic Area.
Cap Rock
This is a beautiful area of the park, and one of the most accessible, with several picnic tables next to the parking area and a wonderful accessible nature trail. If I had my mom or my 17 year-old nephew who uses a power chair with me, I’d definitely bring them here.
Facilities
Large paved parking area, restroom, picnic tables.
Area Description
As you enter the parking area, you’ll see several picnic tables at the base of Cap Rock—a massive granite dome with a precariously balanced boulder on top. Near the accessible parking, you’ll see a large rectangular boulder, and just to the right of it is the trailhead. If you follow the trail around the back of the boulder, you’ll find a restroom and another quiet picnic table tucked at the base of Cap Rock.
Trail Description
At just under half a mile, this flat, hard-packed accessible loop trail with interpretive signs might not be very long, but it sure is pretty. Along the way, you’ll find several park benches overlooking the area—a perfect spot to sit back, relax, and take in the scenery. The combination of desert plants, Joshua trees, and beautiful rock formations gives the landscape a classic Joshua Tree feel.
The trail is beautiful in both directions, so consider walking it one way, then turning around and walking it back the other way. You’ll be happy you did.
Keys View
One of the must-sees in Joshua Tree is the panoramic view over Palm Springs and the Coachella Valley from Keys View. On a clear day, you’ll not only see the valley but also the Salton Sea near the Mexican border, 10,834 ft Mt. San Jacinto, and 11,503 ft Mt. San Gorgonio—the tallest peak in Southern California.
Facilities
Large paved parking area with a paved walkway, restroom.
Area Description
As you approach Keys View, you’ll see an ADA viewpoint on the left with two accessible parking spots and a short paved walkway leading to a small, protected viewpoint. However, if you’re comfortable with the elevated walkway at the main viewpoint a half-mile up the road, the view from there is even better.
As you enter the main parking area, you’ll see a smaller parking area on the right with accessible parking and a restroom. Beyond that, the road becomes one-way as it circles through a larger parking area with more accessible parking and a paved walkway that loops up to the viewpoint.
One way to the viewpoint is shorter but quite steep, with a handrail the length of the walkway and a park bench about halfway up. The other is slightly longer but less steep. It doesn’t have a handrail, but there is a park bench up at the viewpoint. If you’re bringing a stroller or anything on wheels, use caution at the viewpoint. Only a small portion of the walkway is protected.
The view from Keys View is amazing any time of day, but watching the sunrise and sunset from here can be one of the most memorable experiences the park has to offer.
Hall of Horrors
This is a fun area of the park to wander around and explore, especially for those with some scrambling skills.
Facilities
Large paved parking area, restroom.
Area Description
Near the restroom, you’ll find a flat, hard-packed trail that loops out to the base of a huge rock formation. You’ll also see a number of primitive trails used mostly by climbers to access the rock formations scattered throughout the area. What makes this area unique are the narrow slot canyons hidden inside some of the formations, including one known as the Hall of Horrors. Be careful, though—getting into the slot canyons requires some serious scrambling. If you’re not careful, you can quickly find yourself in over your head.
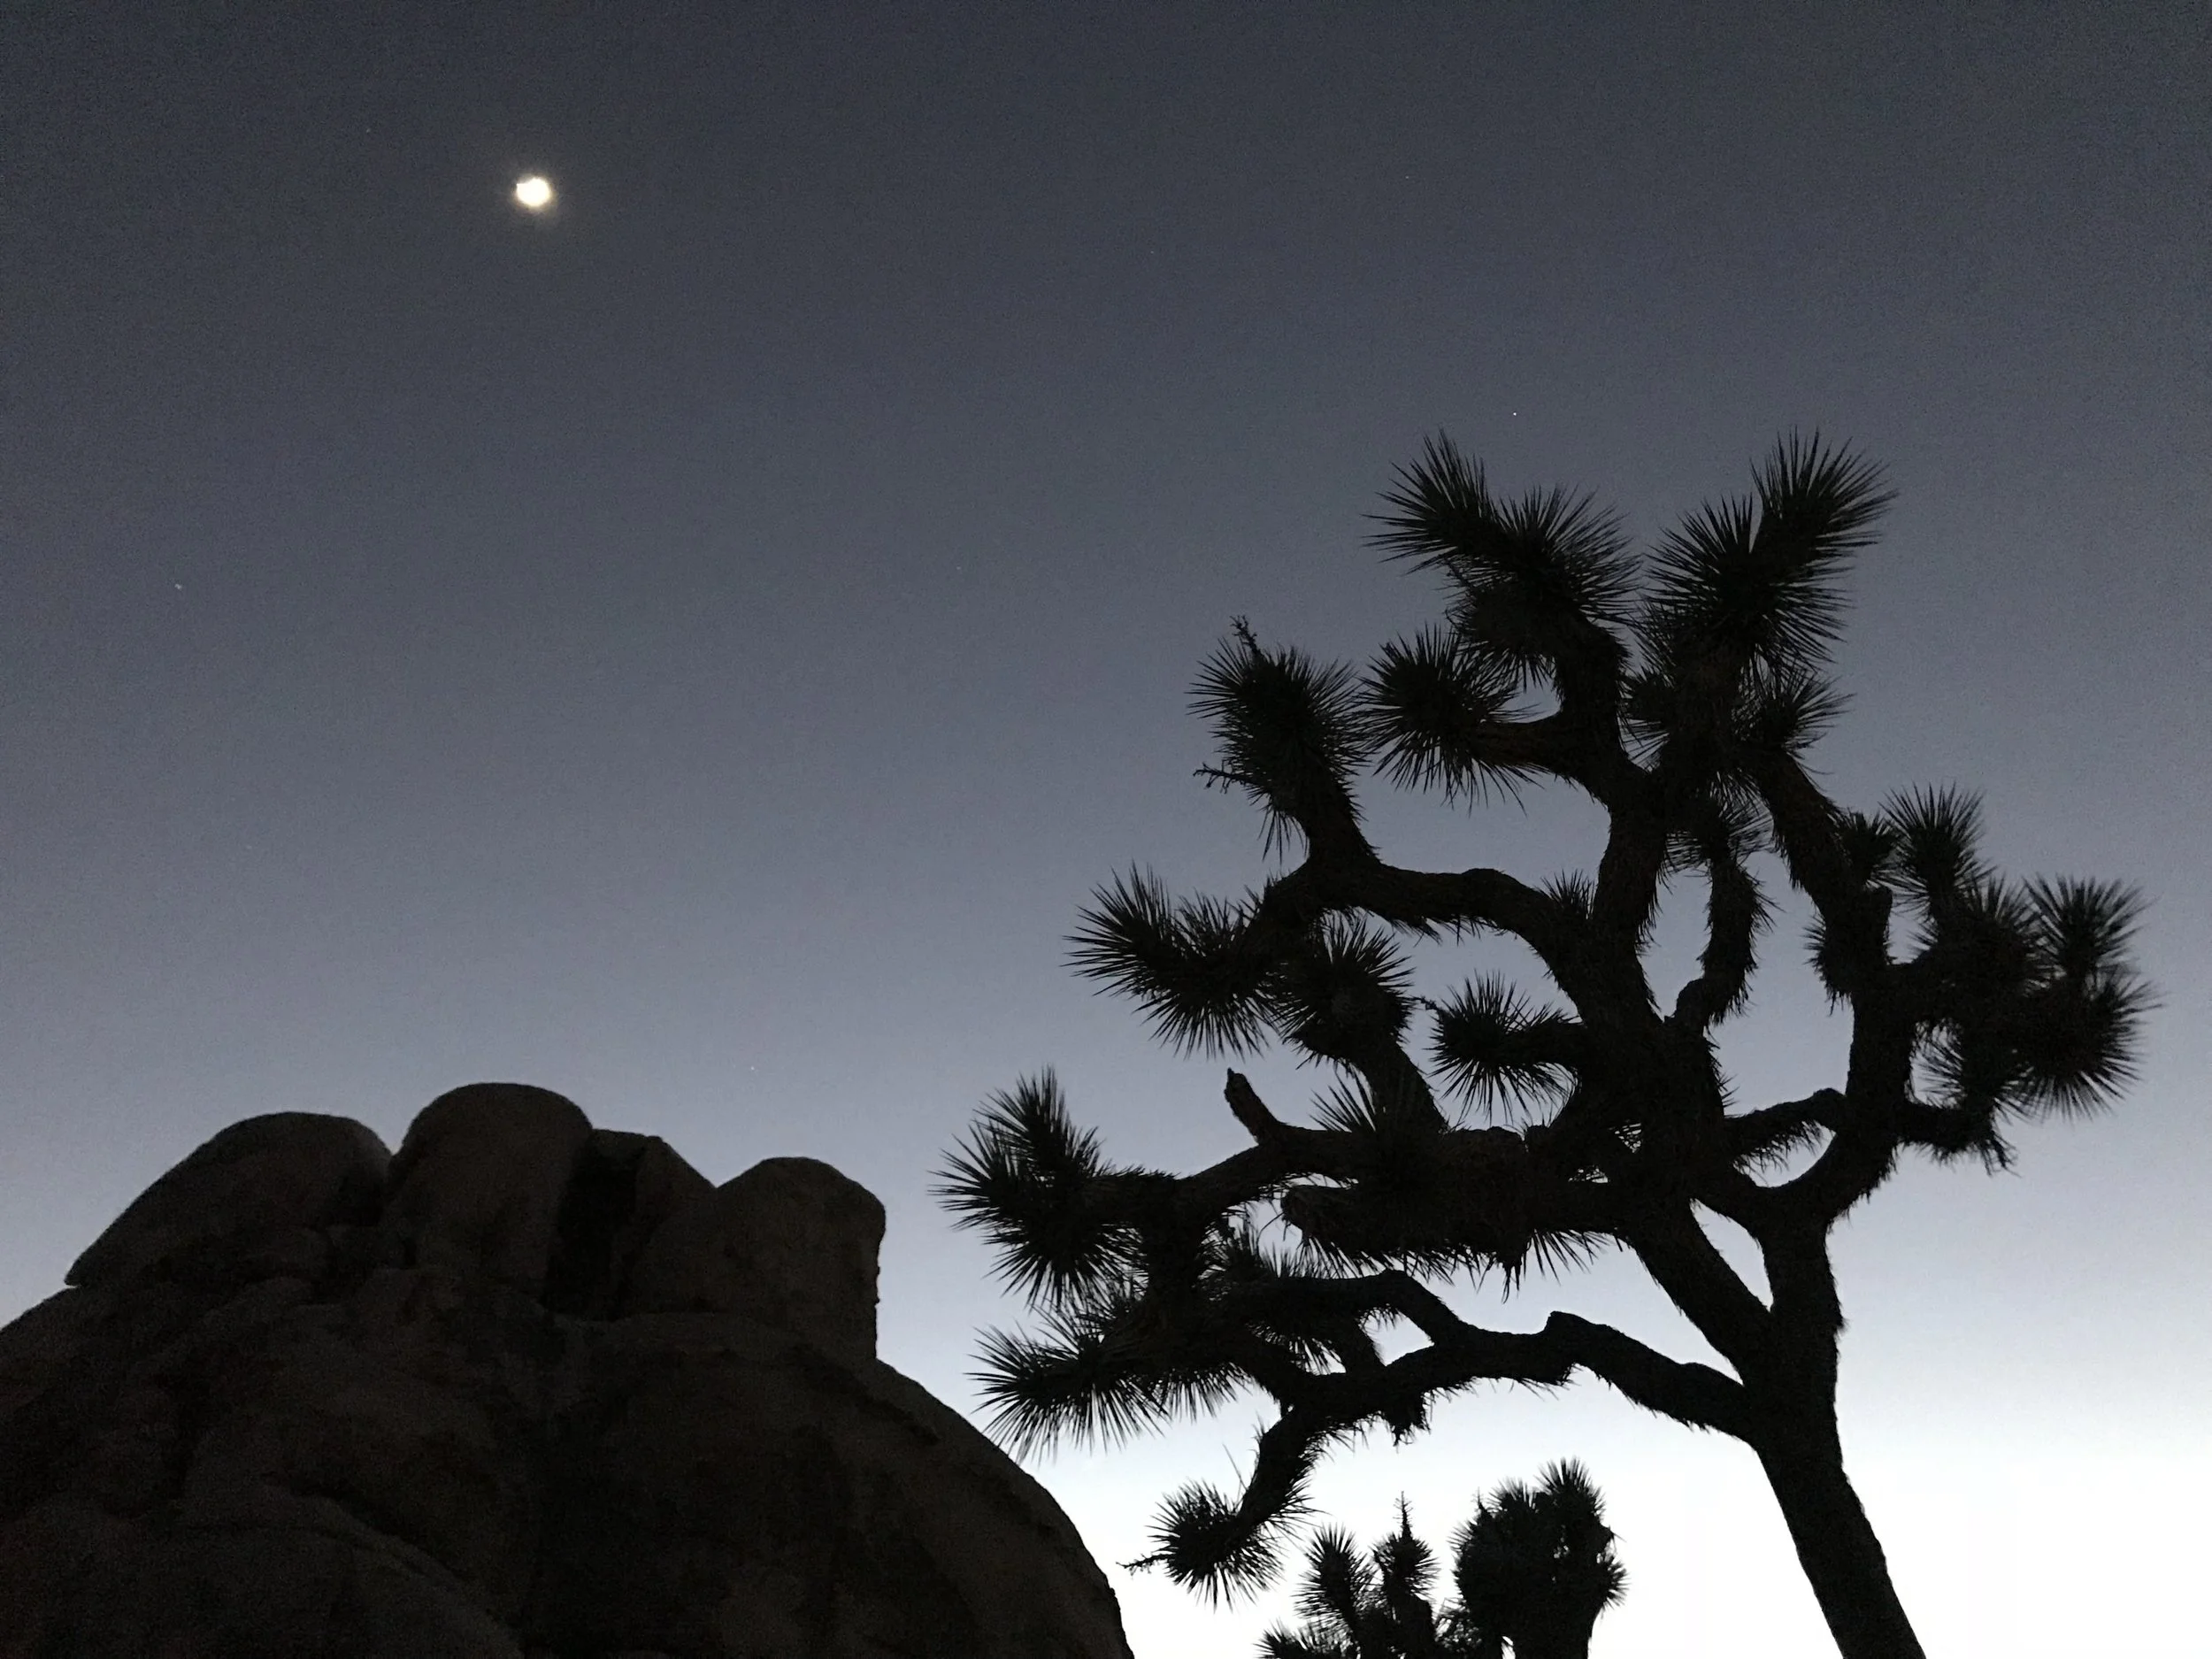
From the Hall of Horrors, you’ll get a really nice view of Ryan Mountain to the south—one of the park’s most prominent peaks and home to one of its best hikes. Back in the day, I’d hike to the summit of Ryan Mountain for sunset, then return to the Hall of Horrors after dark. I recorded this one night while wandering around the backcountry near the Hall of Horrors under a full moon…
Ryan Mountain Trail
If you like to hike, you’ll love this 1.5-mile trail to the top of Ryan Mountain. From the summit, you can pretty much see the entire park. If reaching the top feels a bit much, the views from partway up the trail are incredible, too.
Facilities
Large paved parking area, restroom.
Trail Description
The trail to the summit of Ryan Mountain has lots of rock steps, uneven natural surfaces, and nearly 1,000 feet of steady elevation gain, but the reward is well worth the effort. The higher you climb, the better the view. When you finally reach the top, you’ll have one of the best views in the park.
If you head up for sunrise or sunset, you’ll want a headlamp and maybe a hat, gloves, and a jacket. It can get a little chilly up there, especially if the wind’s howling. If you have binoculars, you’ll want to bring those with you, too.
Beyond Ryan Mountain
After Ryan Mountain, the road climbs through a gentle canyon and out onto an expanse of high desert with a wide-open view of the Mojave and Joshua trees stretching as far as the eye can see. You’ve now entered a quieter, more remote area of the park. Before continuing on, make sure you have enough time. From here, you’ll be heading deeper into the park with a longer drive back to the West Entrance than you might expect.
Skull Rock
With the help of social media, one of the more popular attractions in the park is getting your picture taken next to Skull Rock—a huge boulder that looks like a giant skull.
Personally, I don’t get it. The park is filled with giant boulders that look like faces, animals, all sorts of things. Just use your imagination, and you’ll be amazed at what you see.
Facilities
Parking for Skull Rock is along both sides of Park Blvd, which can turn hectic when it’s busy. If you do stop, please be careful. If there’s no parking or it’s too crowded to stop, keep it moving. It’s much more fun to find your own Skull Rock.
Live Oak Picnic Area
Two little picnic areas here - you want the one on the left.
Facilities
Two small unpaved parking areas, one with a restroom and both with picnic tables.
Area Description
Shortly after turning into Live Oak, the unpaved road splits. To the right is a small turnaround parking area with a restroom and a few picnic tables at the base of a large rock formation. To the left is a quieter, more secluded area with several picnic tables and a beautiful view over the desert. If the park is packed, this is a great place to escape the madness. It’s also a fun area to explore.
Split Rock Trail
I love this trail—at least half of it, anyway.
Facilities
From Park Blvd, take the unpaved road half a mile to a large unpaved parking area with a restroom and a few picnic tables.
Trail Description
As you approach the parking area, you’ll see a small parking area with a restroom on your left. Just beyond that is a larger turnaround parking area with several picnic tables near the base of Split Rock—an enormous boulder split in two.
Most people start the 2.5-mile loop to the left of Split Rock, drop into a large valley, and hike it counterclockwise. However, it’s easier and more scenic to begin at the opposite end, just up from the restroom, hike about halfway, then turn around and head back the way you came.
If you go this way, the trail takes you through a few beautiful little valleys with towering rock formations and excellent views of the surrounding area. In about a mile, you’ll reach a park sign for the Face Rock Trail heading off to the left. From here, the Split Rock Trail turns right and winds its way through the desert before climbing to a high point between two large rock formations with a boulder beside the trail. This marks the turnaround point for the out-and-back.
If you want to continue the loop from here, the trail goes over the high point and out onto a high ridge with a view over the desert. From the ridge, you should be able to see Split Rock and the trailhead way across the valley. If you have binoculars, this is a great place to use them.
The trail becomes a bit more rugged as it descends to the valley floor, where it can get noticeably hotter and the route can occasionally be tricky to follow. If it feels like the trail is leading you down the valley away from Split Rock, don’t worry—it eventually turns right and climbs back up to the trailhead.
Pinto Basin Road
This scenic paved road stretches 36 miles from Park Boulevard down along the remote western edge of the Colorado Desert to Interstate 10. This area of the park has far fewer trails and developed areas than the Mojave—and far fewer people. The drive itself is beautiful, with plenty of opportunities to pull over and take in the view. It’s also a quieter, more peaceful area of the park to explore.
Arch Rock
This 1.5 mile round-trip trail will take you out to a cool little arch with a really a nice view over the desert.
Facilities
Parking for Arch Rock is in the large paved parking area for Twin Tanks, a right-hand turn off Pinto Basin Road. The trailhead is at the far end of the parking lot.
Trail Description
The trail to Arch Rock begins with a relatively flat walk out across the desert. In about half a mile, the trail descends a series of rock steps to the arch, then loops through a maze of giant boulders before reconnecting with the trail back to the trailhead.
If you look at it right, Arch Rock looks like a giant head with a long, skinny neck. If Skull Rock had a cousin, this might be it.
The Colorado Desert
Past this point, Pinto Basin Road begins its long, gradual descent to the Colorado Desert. This is a good place to check in and make sure you have enough time to continue. From here, you’re heading much deeper into the park, with a much longer drive back to the West Entrance than you might expect. If you do decide to continue, you might consider leaving through the south end of the park.
Cholla Cactus Garden
This quarter-mile loop trail through a dense field of teddy-bear cholla also has a beautiful view over the Colorado Desert.
Facilities
Large paved parking area.
Trail Description
The safest way to experience the garden is to enter the quarter-mile loop trail near the accessible parking, walk to the first small wooden bridge, then turn around and head back the way you came. This section is wider and generally easier to navigate than the rest of the loop. Be sure to keep a safe distance from the chollas. They can jump on you if you get too close. Seriously, they can.
Ocotillo Patch
For years, I thought these alien-looking things were cactuses, but they’re actually plants.
Facilities
Small paved parking area.
Area Description
Down the road from the cactus garden is a small parking area on the right for the Ocotillo Patch. In the spring, this stand of unusual desert plants produces reddish-orange blooms at the tips of their long, skinny branches, adding a surprising splash of color to an otherwise barren desert. Despite their cactus-like appearance, ocotillos are more closely related to blueberries than to cacti. Go figure.
Desert Views
Four consecutive pullouts along the side of the road, each with a view over the Colorado Desert.
Facilities
Small paved parking areas.
Area Description
Down the road from the Ocotillo Patch, you’ll come to a large parking area on the left for Turkey Flats, with a great view of Pinto Mountain to the north and the Colorado Desert to the east. At this point, the road begins to climb, and as it does, you’ll pass four consecutive pullouts on the left, each with a better view over the desert.
If you want to get out of the car and have a look around, the third pullout has a hard-packed area of open desert in front of it. From there, you have an excellent view over the Colorado with the Coxcomb Mountains way off in the distance. It’s hard to believe those mountains are still within the park.
Cottonwood Springs
This is a short walk to lush desert oasis, with the option to continue on a longer hike with amazing views over the southern end of the park.
Facilities
Large paved parking area.
Trail Description
At the far end of the parking area, you’ll see an unpaved trail with a handrail leading a couple hundred feet down a steep hill to the Cottonwood Springs oasis. At the bottom, you’ll find a park bench with a close up view of the oasis. The spring itself is mostly hidden behind a cluster of large fan palms, but if you continue another 100 feet along the trail and turn around, you’ll get a fantastic view of the entire oasis.
Mastodon Peak Trail
If you’re up for a hike, just follow the trail up the hill for about half a mile to a junction marked by a park sign for the Mastodon Peak Trail, which heads off to the left. This three-mile loop includes lots of rock steps, uneven natural surfaces, and about 400 feet of elevation gain. From the high point, you’ll be rewarded with a beautiful view over the south end of the park as you make your way back to the Cottonwood Springs parking area.
Bonus Area
After the Cottonwood Visitor Center, Pinto Basin Road winds through a gentle canyon on its way to Interstate 10. When you exit the canyon, you’ll see a small paved parking area on the left for the Bodega Trail. This quarter-mile loop might not look like much from the road, but it’s actually a nice place to relax on one of the park benches and take in the beautiful view over the desert - one last look before jumping on the 10.
Disclaimer
The information in this guide is provided for general informational purposes only. While every effort has been made to ensure accuracy, conditions in the park can change without notice due to weather, park management, or natural events. Visitors are responsible for their own safety while driving, parking, walking, hiking, exploring, scrambling, and climbing. Trails and roads may be uneven, steep, exposed, or otherwise challenging. Always exercise caution, follow posted signs and regulations, and carry sufficient water, food, and safety equipment. This guide does not replace official park regulations, signage, or guidance from National Park Service personnel. Use of this guide is at your own risk. The author and publisher are not responsible for accidents, injuries, property damage, or other incidents that may occur while using this guide.
Copyright © 2026 Day Tripper’s Guide
Photography © 2026 Day Tripper’s Guide
All rights reserved. No part of this publication may be reproduced or distributed without prior written permission. For inquiries, visit daytrippersguide.com.